> ## Documentation Index
> Fetch the complete documentation index at: https://private-7c7dfe99-trino-dialect.mintlify.site/llms.txt
> Use this file to discover all available pages before exploring further.
> Configure o Amazon RDS Postgres como origem para o ClickPipes
# Guia de configuração da origem RDS Postgres
export const IAMAuthentication = ({engine, service, children}) => {
const services = {
aurora: {
name: 'Aurora',
resource: 'cluster',
id: 'cluster-xxxxxxxxxxxxxx'
},
rds: {
name: 'RDS',
resource: 'instance',
id: 'db-xxxxxxxxxxxxxx'
}
};
const createUserStatements = {
postgres: `CREATE USER clickpipes_iam_user;
GRANT rds_iam TO clickpipes_iam_user;`,
mysql: `CREATE USER 'clickpipes_iam_user' IDENTIFIED WITH AWSAuthenticationPlugin AS 'RDS';`
};
const svc = services[String(service).toLowerCase()];
const createUserSql = createUserStatements[String(engine).toLowerCase()];
if (!svc) throw new Error(`Unsupported IAM authentication service: ${service}`);
if (!createUserSql) throw new Error(`Unsupported IAM authentication engine: ${engine}`);
return <>
Instead of a password, you can authenticate the ClickPipes user with an AWS IAM role. This lets ClickPipes connect to your Amazon {svc.name} {svc.resource} without storing database credentials.
Enable IAM authentication
- Log in to your AWS account and go to the {svc.name} {svc.resource} you want to configure.
- Click Modify.
- Scroll to the Database authentication section.
- Select Password and IAM database authentication.
- Click Continue.
- Review the changes and select Apply immediately.
Create the ClickPipes user
Create the ClickPipes user with IAM authentication enabled, then grant it the same schema and replication privileges shown above:
{createUserSql}
{children}
Obtain the ClickHouse service IAM role ARN
- Log in to your ClickHouse Cloud account.
- Select the ClickHouse service you want to connect.
- Select the Settings tab.
- Scroll to the Network security information section at the bottom of the page.
- Copy the service's Service role ID (IAM) value, shown below.
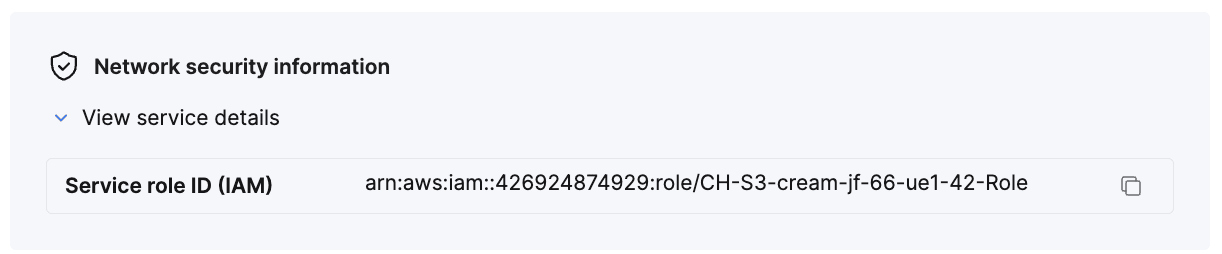
This value is your {'{ClickHouse_IAM_ARN}'} — the role ClickPipes uses to access your {svc.name} {svc.resource}.
Obtain the resource ID
- Log in to your AWS account and go to the {svc.name} {svc.resource} you want to configure.
- Select the Configuration tab.
- Note the Resource ID value — it looks like
{svc.id}. This is your {'{RDS_RESOURCE_ID}'}, which you reference in the permissions policy.
Create the IAM role
- Log in to your AWS account with an IAM user that has permission to create and manage IAM roles.
- Open the IAM console.
-
Create a new IAM role with the following trust and permissions policies.
Trust policy (replace {'{ClickHouse_IAM_ARN}'} with the IAM role ARN of your ClickHouse instance):
{`{
"Version": "2012-10-17",
"Statement": [
{
"Effect": "Allow",
"Principal": {
"AWS": "{ClickHouse_IAM_ARN}"
},
"Action": [
"sts:AssumeRole",
"sts:TagSession"
]
}
]
}`}
Permissions policy (replace {'{RDS_RESOURCE_ID}'} with the resource ID of your {svc.name} {svc.resource}, {'{RDS_REGION}'} with its region, and {'{AWS_ACCOUNT}'} with your AWS account ID):
{`{
"Version": "2012-10-17",
"Statement": [
{
"Effect": "Allow",
"Action": [
"rds-db:connect"
],
"Resource": [
"arn:aws:rds-db:{RDS_REGION}:{AWS_ACCOUNT}:dbuser:{RDS_RESOURCE_ID}/clickpipes_iam_user"
]
}
]
}`}
- Once the role is created, copy its ARN. This is your
{'{RDS_ACCESS_IAM_ROLE_ARN}'}.
You can now use this IAM role to authenticate with your {svc.name} {svc.resource} from ClickPipes.
;
};
export const Image = ({img, alt, size = "lg"}) => {
const normalizedSize = ["sm", "md", "lg"].includes(size) ? size : "lg";
return ;
};
## Versões compatíveis do Postgres
O ClickPipes oferece suporte ao Postgres versão 12 e posteriores.
## Habilite a replicação lógica
Você pode pular esta seção se a sua instância do RDS já tiver a seguinte configuração definida:
* `rds.logical_replication = 1`
Essa configuração geralmente já vem pré-configurada se você já usou outra ferramenta de replicação de dados.
```text theme={null}
postgres=> SHOW rds.logical_replication ;
rds.logical_replication
-------------------------
on
(1 row)
```
Caso ainda não esteja configurado, siga estas etapas:
1. Crie um novo grupo de parâmetros para a sua versão do Postgres com as configurações necessárias:
* Defina `rds.logical_replication` como 1
2. Aplique o novo grupo de parâmetros ao seu banco de dados RDS Postgres
3. Reinicie a sua instância do RDS para aplicar as alterações
## Configurar o usuário do banco de dados
Conecte-se à sua instância do RDS Postgres como usuário administrador e execute os seguintes comandos:
1. Crie um usuário dedicado para o ClickPipes:
```sql theme={null}
CREATE USER clickpipes_user PASSWORD 'some-password';
```
2. Conceda acesso somente leitura no nível do schema ao usuário criado na etapa anterior. O exemplo abaixo mostra as permissões para o schema `public`. Repita esses comandos para cada schema que contenha tabelas que você deseja replicar:
```sql theme={null}
GRANT USAGE ON SCHEMA "public" TO clickpipes_user;
GRANT SELECT ON ALL TABLES IN SCHEMA "public" TO clickpipes_user;
ALTER DEFAULT PRIVILEGES IN SCHEMA "public" GRANT SELECT ON TABLES TO clickpipes_user;
```
3. Conceda privilégios de replicação ao usuário:
```sql theme={null}
GRANT rds_replication TO clickpipes_user;
```
4. Crie uma [publicação](https://www.postgresql.org/docs/current/logical-replication-publication.html) com as tabelas que você deseja replicar. Recomendamos fortemente incluir na publicação apenas as tabelas necessárias para evitar sobrecarga de desempenho.
Qualquer tabela incluída na publicação deve ter uma **chave primária** definida *ou* ter a **identidade de réplica** configurada como `FULL`. Consulte as [FAQs do Postgres](/pt-BR/integrations/clickpipes/postgres/faq#how-should-i-scope-my-publications-when-setting-up-replication) para ver orientações sobre escopo.
* Para criar uma publicação para tabelas específicas:
```sql theme={null}
CREATE PUBLICATION clickpipes FOR TABLE table_to_replicate, table_to_replicate2;
```
* Para criar uma publicação para todas as tabelas em um schema específico:
```sql theme={null}
CREATE PUBLICATION clickpipes FOR TABLES IN SCHEMA "public";
```
A publicação `clickpipes` define o conjunto de tabelas cujos eventos de alteração serão transmitidos ao ClickPipes. Recomendamos não usar `FOR ALL TABLES`, a menos que você pretenda replicar todas as tabelas, pois incluir tabelas desnecessárias aumenta o tráfego de WAL do Postgres para o ClickPipes e reduz a eficiência geral da replicação.
### Usando autenticação IAM (opcional)
A autenticação IAM para replicação exige que o parâmetro `rds.iam_auth_for_replication` esteja definido como `1`. Há suporte para isso a partir do PostgreSQL 11; em versões anteriores, só é possível executar `Initial Load Only` no ClickPipes.
## Configurar o acesso à rede
### Controle de acesso por IP
Se você quiser restringir o tráfego para sua instância do RDS, adicione os [IPs NAT estáticos documentados](/pt-BR/integrations/clickpipes/networking/static-ips) às `Inbound rules` do grupo de segurança do RDS.
### Acesso privado via AWS PrivateLink
Para se conectar à sua instância do RDS por uma rede privada, você pode usar o AWS PrivateLink. Siga nosso [guia de configuração do AWS PrivateLink para ClickPipes](/pt-BR/resources/support-center/knowledge-base/cloud-services/aws-privatelink-setup-for-clickpipes) para configurar a conexão.
### Soluções alternativas para o RDS Proxy
O RDS Proxy não oferece suporte a conexões de replicação lógica. Se você tiver endereços IP dinâmicos no RDS e não puder usar um nome DNS ou uma função Lambda, aqui estão algumas alternativas:
1. Usando um cron job, resolva periodicamente o IP do endpoint do RDS e atualize o NLB se ele tiver mudado.
2. Usando notificações de eventos do RDS com EventBridge/SNS: acione atualizações automaticamente com notificações de eventos do AWS RDS.
3. EC2 estável: implante uma instância do EC2 para atuar como um serviço de polling ou proxy baseado em IP.
4. Automatize o gerenciamento de endereços IP usando ferramentas como Terraform ou CloudFormation.
## Próximos passos
Agora você pode [criar seu ClickPipe](/pt-BR/integrations/clickpipes/postgres/index) e começar a fazer a ingestão de dados da sua instância do Postgres para o ClickHouse Cloud.
Anote os detalhes da conexão que você usou ao configurar sua instância do Postgres, pois precisará deles durante o processo de criação do ClickPipe.