> ## Documentation Index
> Fetch the complete documentation index at: https://private-7c7dfe99-trino-dialect.mintlify.site/llms.txt
> Use this file to discover all available pages before exploring further.
> Amazon RDS MariaDB を ClickPipes のソースとして設定するための手順ガイド
# RDS MariaDB ソースの設定ガイド
export const IAMAuthentication = ({engine, service, children}) => {
const services = {
aurora: {
name: 'Aurora',
resource: 'cluster',
id: 'cluster-xxxxxxxxxxxxxx'
},
rds: {
name: 'RDS',
resource: 'instance',
id: 'db-xxxxxxxxxxxxxx'
}
};
const createUserStatements = {
postgres: `CREATE USER clickpipes_iam_user;
GRANT rds_iam TO clickpipes_iam_user;`,
mysql: `CREATE USER 'clickpipes_iam_user' IDENTIFIED WITH AWSAuthenticationPlugin AS 'RDS';`
};
const svc = services[String(service).toLowerCase()];
const createUserSql = createUserStatements[String(engine).toLowerCase()];
if (!svc) throw new Error(`Unsupported IAM authentication service: ${service}`);
if (!createUserSql) throw new Error(`Unsupported IAM authentication engine: ${engine}`);
return <>
Instead of a password, you can authenticate the ClickPipes user with an AWS IAM role. This lets ClickPipes connect to your Amazon {svc.name} {svc.resource} without storing database credentials.
Enable IAM authentication
- Log in to your AWS account and go to the {svc.name} {svc.resource} you want to configure.
- Click Modify.
- Scroll to the Database authentication section.
- Select Password and IAM database authentication.
- Click Continue.
- Review the changes and select Apply immediately.
Create the ClickPipes user
Create the ClickPipes user with IAM authentication enabled, then grant it the same schema and replication privileges shown above:
{createUserSql}
{children}
Obtain the ClickHouse service IAM role ARN
- Log in to your ClickHouse Cloud account.
- Select the ClickHouse service you want to connect.
- Select the Settings tab.
- Scroll to the Network security information section at the bottom of the page.
- Copy the service's Service role ID (IAM) value, shown below.
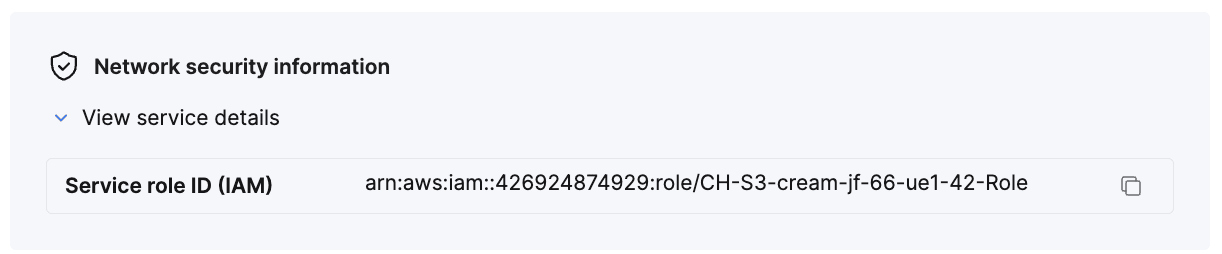
This value is your {'{ClickHouse_IAM_ARN}'} — the role ClickPipes uses to access your {svc.name} {svc.resource}.
Obtain the resource ID
- Log in to your AWS account and go to the {svc.name} {svc.resource} you want to configure.
- Select the Configuration tab.
- Note the Resource ID value — it looks like
{svc.id}. This is your {'{RDS_RESOURCE_ID}'}, which you reference in the permissions policy.
Create the IAM role
- Log in to your AWS account with an IAM user that has permission to create and manage IAM roles.
- Open the IAM console.
-
Create a new IAM role with the following trust and permissions policies.
Trust policy (replace {'{ClickHouse_IAM_ARN}'} with the IAM role ARN of your ClickHouse instance):
{`{
"Version": "2012-10-17",
"Statement": [
{
"Effect": "Allow",
"Principal": {
"AWS": "{ClickHouse_IAM_ARN}"
},
"Action": [
"sts:AssumeRole",
"sts:TagSession"
]
}
]
}`}
Permissions policy (replace {'{RDS_RESOURCE_ID}'} with the resource ID of your {svc.name} {svc.resource}, {'{RDS_REGION}'} with its region, and {'{AWS_ACCOUNT}'} with your AWS account ID):
{`{
"Version": "2012-10-17",
"Statement": [
{
"Effect": "Allow",
"Action": [
"rds-db:connect"
],
"Resource": [
"arn:aws:rds-db:{RDS_REGION}:{AWS_ACCOUNT}:dbuser:{RDS_RESOURCE_ID}/clickpipes_iam_user"
]
}
]
}`}
- Once the role is created, copy its ARN. This is your
{'{RDS_ACCESS_IAM_ROLE_ARN}'}.
You can now use this IAM role to authenticate with your {svc.name} {svc.resource} from ClickPipes.
;
};
export const Image = ({img, alt, size = "lg"}) => {
const normalizedSize = ["sm", "md", "lg"].includes(size) ? size : "lg";
return ;
};
これは、MySQL ClickPipe 経由でデータをレプリケーションするために、RDS MariaDB インスタンスを設定する手順をまとめたガイドです。
[こちら](/ja/integrations/clickpipes/mysql/faq)の MySQL に関するよくある質問にも、あわせて目を通すことをお勧めします。よくある質問ページは随時更新されています。
## バイナリログの保持を有効にする
バイナリログは、MySQL server インスタンスで行われたデータ変更に関する情報を含むログファイルの集合です。バイナリログファイルはレプリケーションに必要です。以下の両方の手順を実行する必要があります。
自動バックアップ機能によって、MySQL のバイナリログを有効にするかどうかが決まります。これは AWS コンソールで設定できます。
レプリケーションのユースケースに応じて、バックアップ保持期間を十分長く設定することをお勧めします。
Amazon RDS for MariaDB では、binlog の保持期間 (変更内容を含む binlog ファイルを保持しておく時間) の設定方法が異なります。binlog ファイルが削除される前に一部の変更が読み取られないと、レプリケーションを継続できなくなります。binlog retention hours のデフォルト値は NULL で、これはバイナリログが保持されないことを意味します。
DB インスタンスでバイナリログを保持する時間数を指定するには、レプリケーションに十分な長さの binlog の保持期間を指定して、mysql.rds\_set\_configuration 関数を使用します。推奨される最小値は `24 hours` です。
```text theme={null}
mysql=> call mysql.rds_set_configuration('binlog retention hours', 24);
```
## パラメータグループで binlog 設定を構成する
パラメータグループは、RDS Console で MariaDB インスタンスをクリックし、`Configurations` タブに移動すると確認できます。
パラメータグループのリンクをクリックすると、パラメータグループのページに移動します。右上に `Edit` ボタンがあります。
`binlog_format`、`binlog_row_metadata`、`binlog_row_image` は次のように設定する必要があります。
1. `binlog_format` を `ROW` に設定します。
2. `binlog_row_metadata` を `FULL` に設定します。
3. `binlog_row_image` を `FULL` に設定します。
次に、右上の `Save Changes` をクリックします。変更を反映するには、インスタンスの再起動が必要になる場合があります。RDS インスタンスの `Configurations` タブで、パラメータグループのリンクの横に `Pending reboot` と表示されている場合は、インスタンスの再起動が必要である可能性が高いことを示しています。
MariaDB クラスターを使用している場合、上記のパラメータは DB インスタンスグループではなく、[DB Cluster](https://docs.aws.amazon.com/AmazonRDS/latest/AuroraUserGuide/USER_WorkingWithParamGroups.CreatingCluster.html) のパラメータグループにあります。
## GTID モードを有効にする
Global Transaction Identifiers (GTID) は、MySQL/MariaDB でコミットされた各トランザクションに割り当てられる一意の ID です。これにより、binlog レプリケーションが簡素化され、トラブルシューティングも容易になります。MariaDB ではデフォルトで GTID モードが有効になっているため、利用するためにユーザー側で追加の操作を行う必要はありません。
## データベースユーザーを設定する
管理者ユーザーとして RDS MariaDB インスタンスに接続し、次のコマンドを実行します。
1. ClickPipes 専用のユーザーを作成します。
```sql theme={null}
CREATE USER 'clickpipes_user'@'host' IDENTIFIED BY 'some-password';
```
2. スキーマに対する権限を付与します。次の例では、`mysql` データベースに対する権限を示しています。レプリケーション対象とする各データベースおよびホストについて、これらのコマンドを繰り返してください。
```sql theme={null}
GRANT SELECT ON `mysql`.* TO 'clickpipes_user'@'host';
```
3. ユーザーにレプリケーション権限を付与します。
```sql theme={null}
GRANT REPLICATION CLIENT ON *.* TO 'clickpipes_user'@'%';
GRANT REPLICATION SLAVE ON *.* TO 'clickpipes_user'@'%';
```
### IAM認証を使用する (任意)
AWS は、[バージョン 10.6.5 で RDS for MariaDB 向けの IAM database authentication を導入しました](https://aws.amazon.com/blogs/database/iam-authentication-with-amazon-rds-for-mariadb/) 。サポート状況は、使用するエンジンの正確なバージョンと AWS リージョンによって異なります。このオプションを使用する前に、[AWS の現在のサポート対象リージョンとエンジンバージョン](https://docs.aws.amazon.com/AmazonRDS/latest/UserGuide/Concepts.RDS_Fea_Regions_DB-eng.Feature.IamDatabaseAuthentication.html)を確認してください。
## ネットワークアクセスを設定する
### IP ベースのアクセス制御
RDS インスタンスへのトラフィックを制限する場合は、RDS のセキュリティグループの `Inbound rules` に、[ドキュメントに記載されている固定 NAT IP](/ja/integrations/clickpipes/networking/static-ips) を追加してください。
### AWS PrivateLink 経由のプライベートアクセス
プライベートネットワーク経由で RDS インスタンスに接続するには、AWS PrivateLink を使用できます。接続を設定するには、[ClickPipes 向け AWS PrivateLink セットアップガイド](/ja/resources/support-center/knowledge-base/cloud-services/aws-privatelink-setup-for-clickpipes)に従ってください。