> ## Documentation Index
> Fetch the complete documentation index at: https://private-7c7dfe99-trino-dialect.mintlify.site/llms.txt
> Use this file to discover all available pages before exploring further.
> Configura Amazon RDS Postgres como origen para ClickPipes
# Guía de configuración del origen RDS Postgres
export const IAMAuthentication = ({engine, service, children}) => {
const services = {
aurora: {
name: 'Aurora',
resource: 'cluster',
id: 'cluster-xxxxxxxxxxxxxx'
},
rds: {
name: 'RDS',
resource: 'instance',
id: 'db-xxxxxxxxxxxxxx'
}
};
const createUserStatements = {
postgres: `CREATE USER clickpipes_iam_user;
GRANT rds_iam TO clickpipes_iam_user;`,
mysql: `CREATE USER 'clickpipes_iam_user' IDENTIFIED WITH AWSAuthenticationPlugin AS 'RDS';`
};
const svc = services[String(service).toLowerCase()];
const createUserSql = createUserStatements[String(engine).toLowerCase()];
if (!svc) throw new Error(`Unsupported IAM authentication service: ${service}`);
if (!createUserSql) throw new Error(`Unsupported IAM authentication engine: ${engine}`);
return <>
Instead of a password, you can authenticate the ClickPipes user with an AWS IAM role. This lets ClickPipes connect to your Amazon {svc.name} {svc.resource} without storing database credentials.
Enable IAM authentication
- Log in to your AWS account and go to the {svc.name} {svc.resource} you want to configure.
- Click Modify.
- Scroll to the Database authentication section.
- Select Password and IAM database authentication.
- Click Continue.
- Review the changes and select Apply immediately.
Create the ClickPipes user
Create the ClickPipes user with IAM authentication enabled, then grant it the same schema and replication privileges shown above:
{createUserSql}
{children}
Obtain the ClickHouse service IAM role ARN
- Log in to your ClickHouse Cloud account.
- Select the ClickHouse service you want to connect.
- Select the Settings tab.
- Scroll to the Network security information section at the bottom of the page.
- Copy the service's Service role ID (IAM) value, shown below.
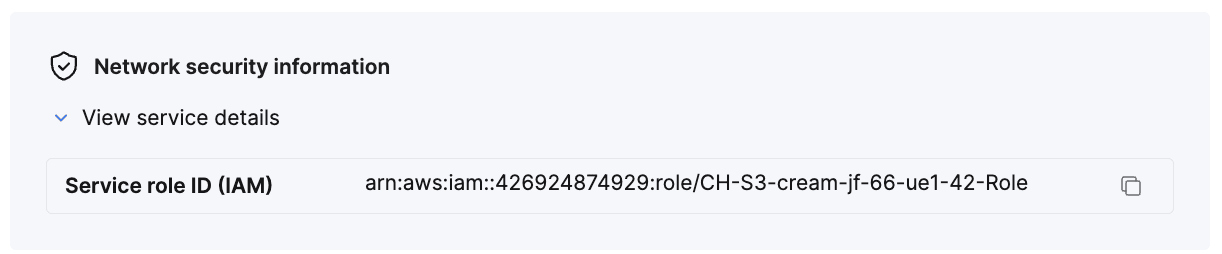
This value is your {'{ClickHouse_IAM_ARN}'} — the role ClickPipes uses to access your {svc.name} {svc.resource}.
Obtain the resource ID
- Log in to your AWS account and go to the {svc.name} {svc.resource} you want to configure.
- Select the Configuration tab.
- Note the Resource ID value — it looks like
{svc.id}. This is your {'{RDS_RESOURCE_ID}'}, which you reference in the permissions policy.
Create the IAM role
- Log in to your AWS account with an IAM user that has permission to create and manage IAM roles.
- Open the IAM console.
-
Create a new IAM role with the following trust and permissions policies.
Trust policy (replace {'{ClickHouse_IAM_ARN}'} with the IAM role ARN of your ClickHouse instance):
{`{
"Version": "2012-10-17",
"Statement": [
{
"Effect": "Allow",
"Principal": {
"AWS": "{ClickHouse_IAM_ARN}"
},
"Action": [
"sts:AssumeRole",
"sts:TagSession"
]
}
]
}`}
Permissions policy (replace {'{RDS_RESOURCE_ID}'} with the resource ID of your {svc.name} {svc.resource}, {'{RDS_REGION}'} with its region, and {'{AWS_ACCOUNT}'} with your AWS account ID):
{`{
"Version": "2012-10-17",
"Statement": [
{
"Effect": "Allow",
"Action": [
"rds-db:connect"
],
"Resource": [
"arn:aws:rds-db:{RDS_REGION}:{AWS_ACCOUNT}:dbuser:{RDS_RESOURCE_ID}/clickpipes_iam_user"
]
}
]
}`}
- Once the role is created, copy its ARN. This is your
{'{RDS_ACCESS_IAM_ROLE_ARN}'}.
You can now use this IAM role to authenticate with your {svc.name} {svc.resource} from ClickPipes.
;
};
export const Image = ({img, alt, size = "lg"}) => {
const normalizedSize = ["sm", "md", "lg"].includes(size) ? size : "lg";
return ;
};
## Versiones compatibles de Postgres
ClickPipes es compatible con Postgres 12 y versiones posteriores.
## Habilitar la replicación lógica
Puedes omitir esta sección si tu instancia de RDS ya tiene configurada la siguiente opción:
* `rds.logical_replication = 1`
Esta opción suele venir preconfigurada si antes usaste otra herramienta de replicación de datos.
```text theme={null}
postgres=> SHOW rds.logical_replication ;
rds.logical_replication
-------------------------
on
(1 row)
```
Si aún no está configurado, sigue estos pasos:
1. Crea un nuevo grupo de parámetros para tu versión de Postgres con la configuración requerida:
* Establece `rds.logical_replication` en 1
2. Aplica el nuevo grupo de parámetros a tu base de datos de RDS Postgres
3. Reinicia tu instancia de RDS para aplicar los cambios
## Configurar el usuario de base de datos
Conéctese a su instancia de RDS Postgres como usuario administrador y ejecute los siguientes comandos:
1. Cree un usuario dedicado para ClickPipes:
```sql theme={null}
CREATE USER clickpipes_user PASSWORD 'some-password';
```
2. Conceda acceso de solo lectura a nivel de esquema al usuario que creó en el paso anterior. El siguiente ejemplo muestra los permisos para el esquema `public`. Repita estos comandos para cada esquema que contenga tablas que quiera replicar:
```sql theme={null}
GRANT USAGE ON SCHEMA "public" TO clickpipes_user;
GRANT SELECT ON ALL TABLES IN SCHEMA "public" TO clickpipes_user;
ALTER DEFAULT PRIVILEGES IN SCHEMA "public" GRANT SELECT ON TABLES TO clickpipes_user;
```
3. Conceda privilegios de replicación al usuario:
```sql theme={null}
GRANT rds_replication TO clickpipes_user;
```
4. Cree una [publicación](https://www.postgresql.org/docs/current/logical-replication-publication.html) con las tablas que quiera replicar. Recomendamos encarecidamente incluir en la publicación solo las tablas que necesite para evitar una sobrecarga de rendimiento.
Cualquier tabla incluida en la publicación debe tener una **clave primaria** definida *o* tener su **identidad de réplica** configurada como `FULL`. Consulte las [Preguntas frecuentes de Postgres](/es/integrations/clickpipes/postgres/faq#how-should-i-scope-my-publications-when-setting-up-replication) para obtener orientación sobre cómo delimitar el alcance.
* Para crear una publicación para tablas específicas:
```sql theme={null}
CREATE PUBLICATION clickpipes FOR TABLE table_to_replicate, table_to_replicate2;
```
* Para crear una publicación para todas las tablas de un esquema específico:
```sql theme={null}
CREATE PUBLICATION clickpipes FOR TABLES IN SCHEMA "public";
```
La publicación `clickpipes` define el conjunto de tablas cuyos eventos de cambio se transmitirán a ClickPipes. Recomendamos no usar `FOR ALL TABLES` a menos que tenga la intención de replicar todas las tablas, ya que incluir tablas innecesarias incrementa el tráfico de WAL desde Postgres hacia ClickPipes y reduce la eficiencia general de la replicación.
### Uso de autenticación con IAM (opcional)
La autenticación con IAM para la replicación requiere que el parámetro `rds.iam_auth_for_replication` esté configurado en `1`. Esta función es compatible a partir de PostgreSQL 11; en versiones anteriores, solo puede ejecutar ClickPipes en modo `Initial Load Only`.
## Configurar el acceso de red
### Control de acceso basado en IP
Si desea restringir el tráfico a su instancia de RDS, añada las [IPs NAT estáticas documentadas](/es/integrations/clickpipes/networking/static-ips) a las `reglas de entrada` del grupo de seguridad de su RDS.
### Acceso privado mediante AWS PrivateLink
Para conectarse a su instancia de RDS a través de una red privada, puede usar AWS PrivateLink. Siga nuestra [guía de configuración de AWS PrivateLink para ClickPipes](/es/resources/support-center/knowledge-base/cloud-services/aws-privatelink-setup-for-clickpipes) para establecer la conexión.
### Soluciones alternativas para RDS Proxy
RDS Proxy no admite conexiones de replicación lógica. Si tienes direcciones IP dinámicas en RDS y no puedes usar un nombre DNS ni una función Lambda, aquí tienes algunas alternativas:
1. Con una tarea cron, resuelve periódicamente la IP del endpoint de RDS y actualiza el NLB si cambia.
2. Usando notificaciones de eventos de RDS con EventBridge/SNS: desencadena actualizaciones automáticamente mediante las notificaciones de eventos de AWS RDS.
3. EC2 fija: despliega una instancia de EC2 para que actúe como servicio de sondeo o proxy basado en IP.
4. Automatiza la gestión de direcciones IP con herramientas como Terraform o CloudFormation.
## ¿Qué sigue?
Ahora puedes [crear tu ClickPipe](/es/integrations/clickpipes/postgres/index) y empezar a ingestar datos desde tu instancia de Postgres hacia ClickHouse Cloud.
Asegúrate de anotar los datos de conexión que usaste al configurar tu instancia de Postgres, ya que los necesitarás durante el proceso de creación de ClickPipe.